PromptPress
Theme Documentation
Hello there...
Thank you for purchasing my theme. If you have any questions that are beyond the scope of this help file, please feel free to contact me via Support page. Thanks so much!
By: Dannci & Themnific | Support*
* Please note, that theme support does not include:- Customization and installation services
- Support for third party software and plug-ins
Theme Overview
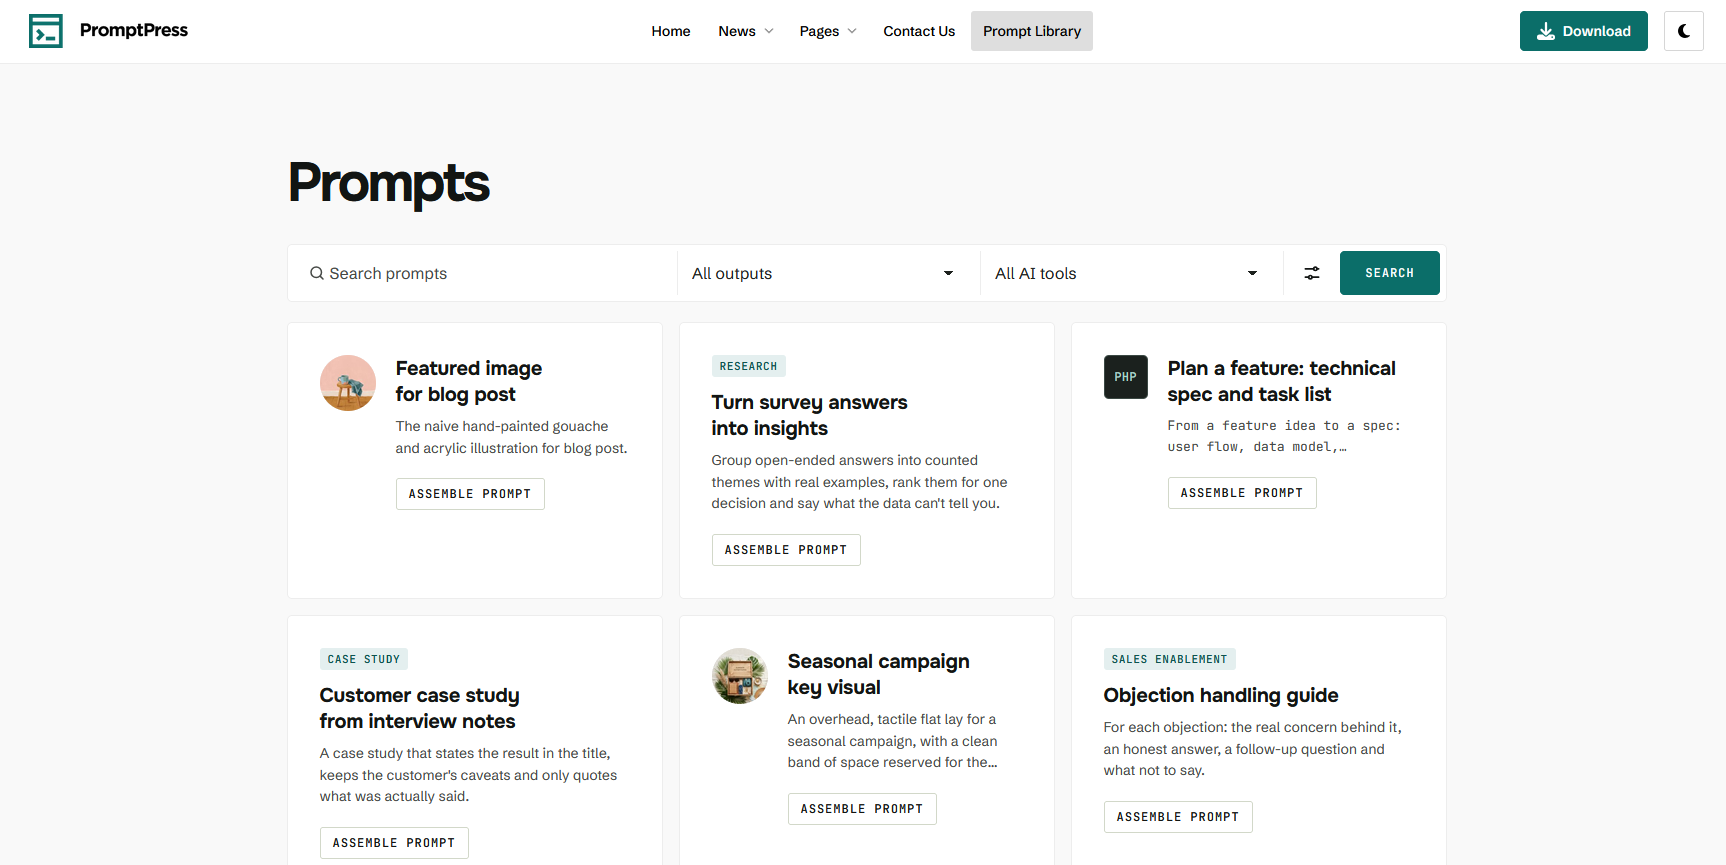
PromptPress is a clean, accessible WordPress theme for publishing and managing AI prompts. It pairs with the AI Prompt Manager plugin, which adds the prompt library itself, and styles every part of it: prompt cards, the search & filter bar, the prompt page, widgets and the command palette.
- Light and dark mode with a visitor switcher in the header,
- 13 color tokens per scheme, Google Fonts typography, four header layouts,
- a two-column prompt “record view” with a properties sidebar and related prompts,
- Elementor support (with the bundled Crafted Addons widgets), WooCommerce support,
- menu icons and badges, five footer widget areas, Schema.org structured data,
- accessible markup (WCAG 2.2 AA default colors), no jQuery on the front end, inline SVG icons.
Theme Installation
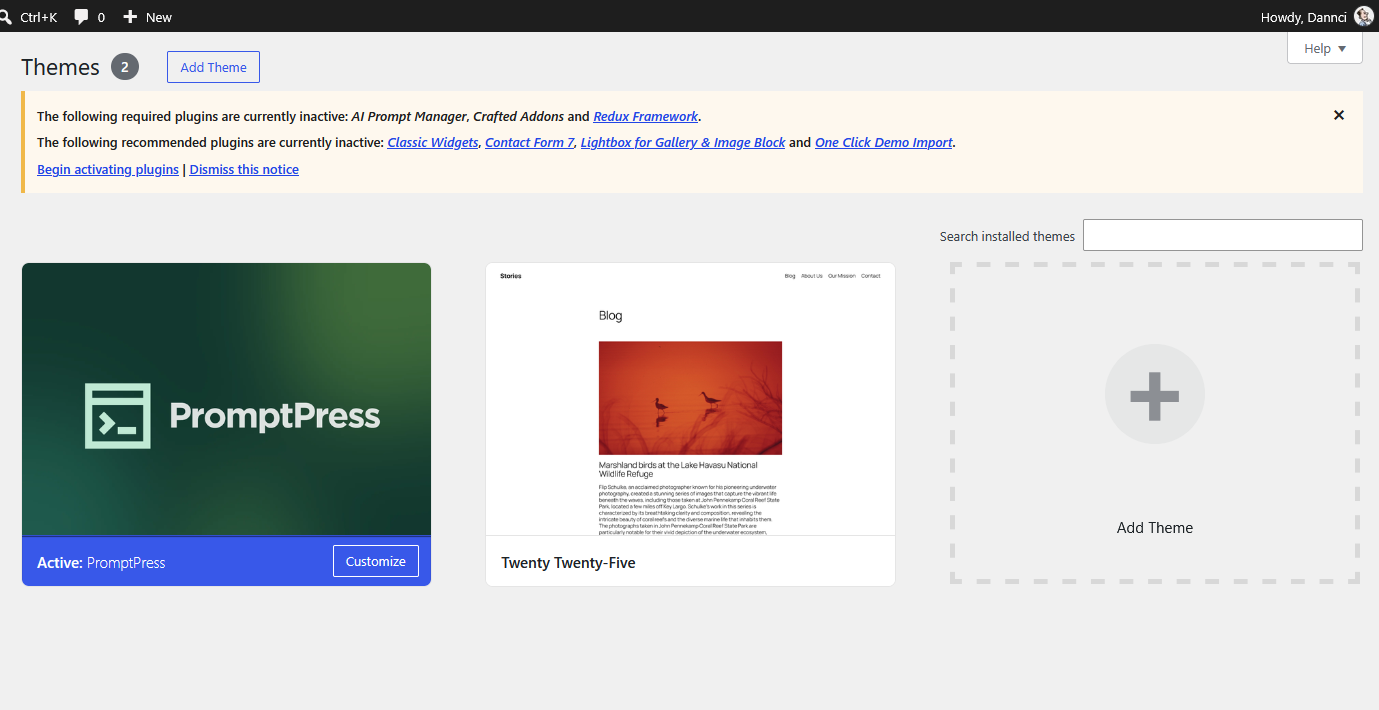
Installation via WP Dashboard:
- Unzip/extract the main (downloaded) theme package – to get
promptpress.zipfile, - Go to Appearance > Themes,
- click on “Add New Theme” > and “Upload Theme”,
- click on ‘Browse’ button, find
promptpress.zipfile on your computer and press 'Install Now', - Activate theme,
- Go to Appearance > Install Plugins after theme activation and install and activate the required plugins!
- Refresh page and 'PromptPress - admin panel' button will appear;
- Go to PromptPress - admin panel (theme options) and setup theme.
Installation via FTP:
- Unzip/extract the main (downloaded) theme package / twice / to get theme folder ‘promptpress’,
- Using FTP client (e.g. FileZilla) upload '
promptpress' folder into 'themes' folder in your WordPress installation (YOUR_HOSTING_ROOT/YOUR_SUBDIRECTORY/wp-content/themes/), - Go to Appearance > Themes, find PromptPress theme and activate theme,
- Go to Appearance > Install Plugins after theme activation and install and activate the required plugins!
- Refresh page and 'PromptPress - admin panel' button will appear;
- Go to PromptPress - admin panel (theme options) and setup theme.
You have to install and activate required plugins (Redux Framework, Elementor, AI Prompt Manager and Crafted Addons). You can do this by visiting Appearance » Install Plugins inside wp dashboard.
Required Plugins
The following message may be visible after theme activation:

Go to Appearance » Install Plugins and install and activate following plugins:
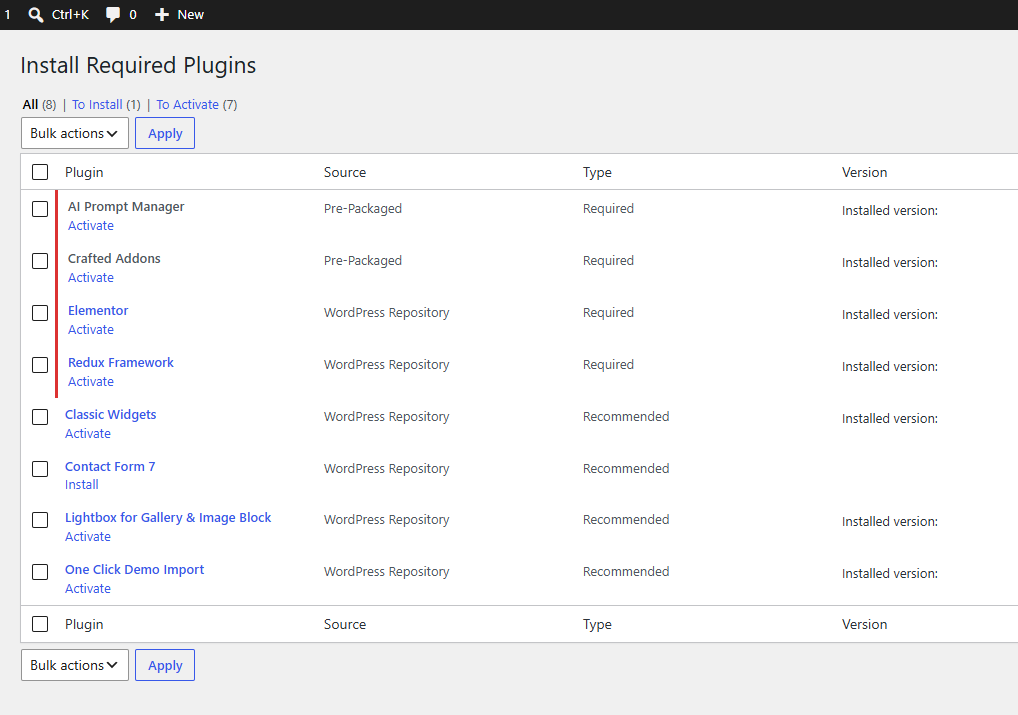
- Redux Framework: powers the theme options panel. Without it the theme works with its default settings.
- Elementor: You can skip the entire setup process after activation, there’s no need to sign up or log in.
- Crafted Addons (bundled with the theme): Elementor blog widgets, a featured posts widget and post options. No setup needed.
- AI Prompt Manager: the prompt library, no setup needed.
Recommended: Lightbox for Gallery & Image Block, Classic Widgets, Contact Form 7 and One Click Demo Import.
Default Setup
1. After theme activation go to Appearance > Install Plugins, and install and activate the required plugins! Then install AI Prompt Manager (see previous chapter).
2. Then go to PromptPress - admin panel
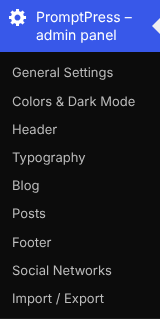
and hit "Save Changes" button to set default style settings:

You can change styling options later.
3. If yoursite.com/prompts/ shows a 404 error, go to Settings » Permalinks and just hit Save Changes.
4. IMPORTANT! It is possible that after theme activation are images wrongly cropped and look ugly! In this case use the following plugin: https://wordpress.org/plugins/regenerate-thumbnails/ to regenerate old thumbnails (from the previous theme).
After plugin installation, start regeneration in Tools > Regenerate Thumbnails. This process can take a while and you cannot close the tab/window until regeneration is done.
Demo Import
Make sure that PromptPress theme, Redux Framework, Elementor, Crafted Addons and AI Prompt Manager are installed and activated before demo import.
One Click Demo Import
- Install and activate 'One Click Demo Import' plugin.
- Go to Appearance > Import Demo Data and hit the 'Import' button of the 'Default Demo'.
- Install the recommended plugins (if you want to import/use them) and hit 'Continue & Import'. Wait until the import is done (it can take few moments).
The import loads the demo content (pages, posts, prompts, menus), the widgets and the theme options. After the import it automatically:
- assigns the “Main menu”, “Additional menu” and “Footer menu” to their locations,
- sets the “Home” page as the front page and the “News” page as the posts page.
AI Prompt Manager settings (Prompts > Settings) are not part of the demo. Check them after the import, e.g. enable the command palette on the front end if you want it.
Homepage Setup
- In 'Pages' section create new page > name it 'Home'
- Select the 'Elementor Full Width (Transparent Header)' template for this page (the header sits transparently over your first, hero section) and publish the page. Alternatively, select 'No Sidebar Layout (Wide)' for a normal header.
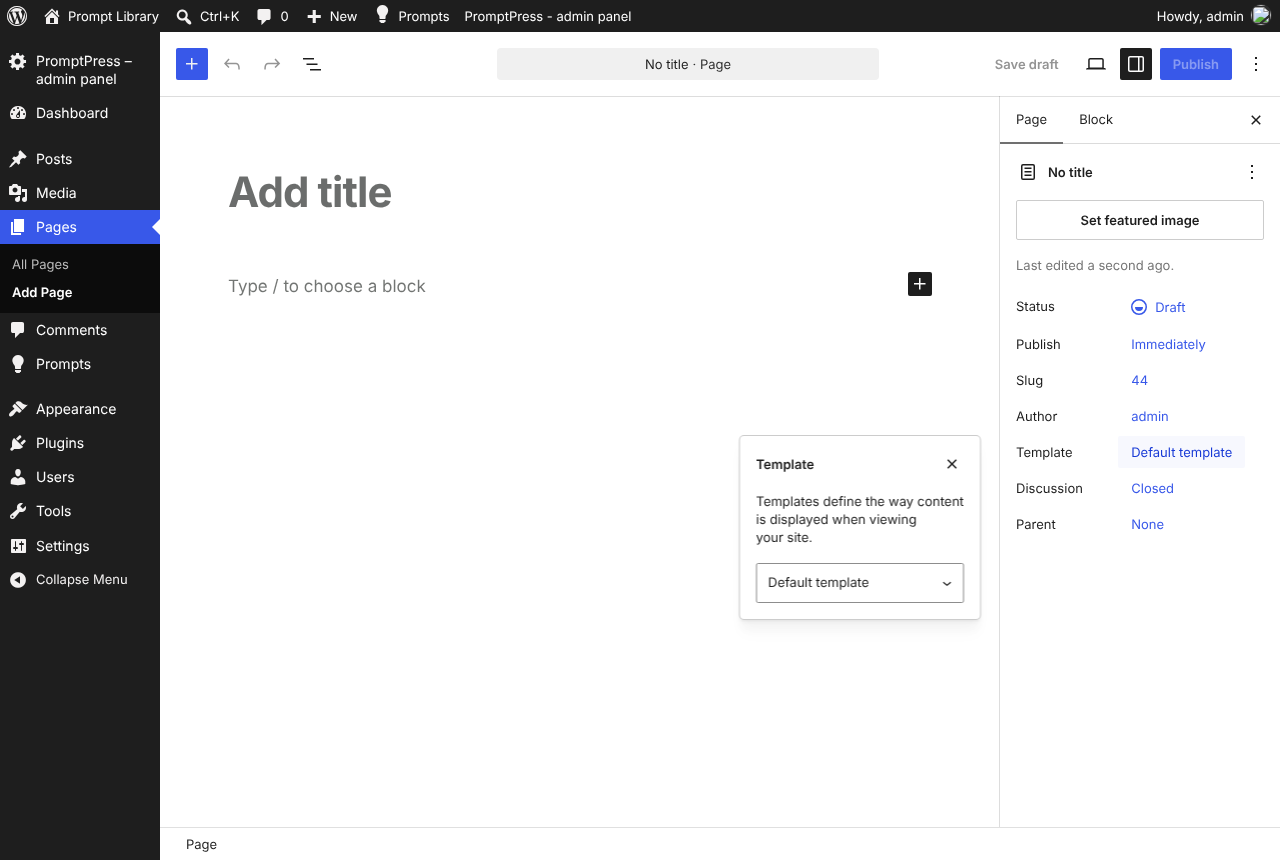
- Go to Settings > Reading and set the created 'Home' page as Static page > Homepage:
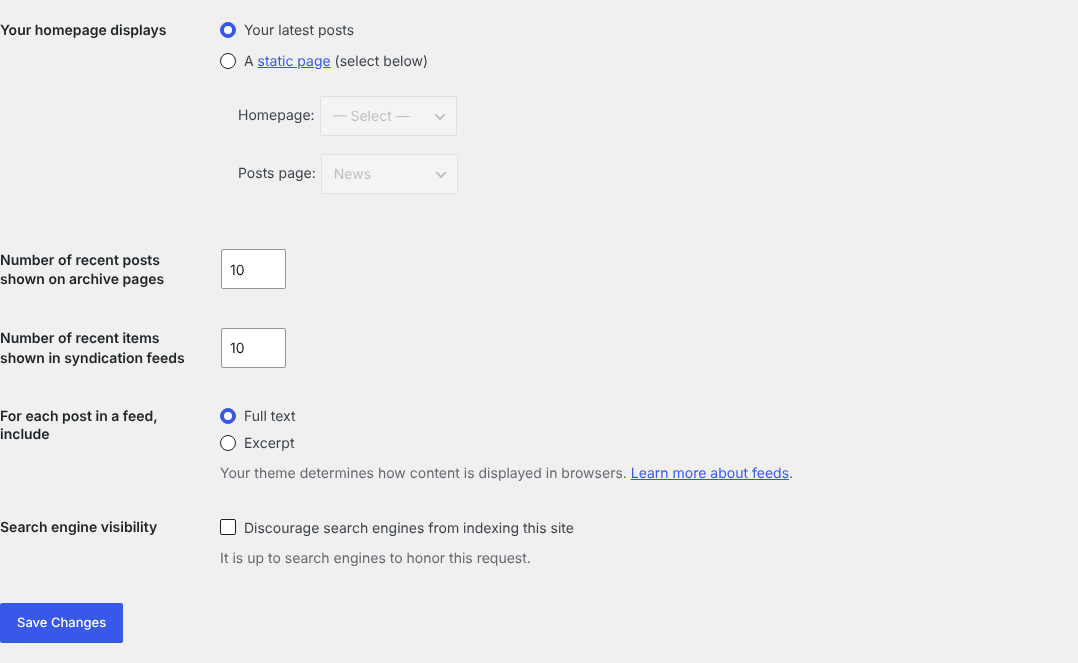
- Empty homepage is created now! In next steps, we'll create homepage content using 'Elementor' page builder: open the 'Home' page and hit the 'Edit with Elementor' button.
I recommend creating a few prompts (Prompts > Add New Prompt) and a few classic blog posts with 'featured images' before you start building the homepage in Elementor.
Adding Hero Section
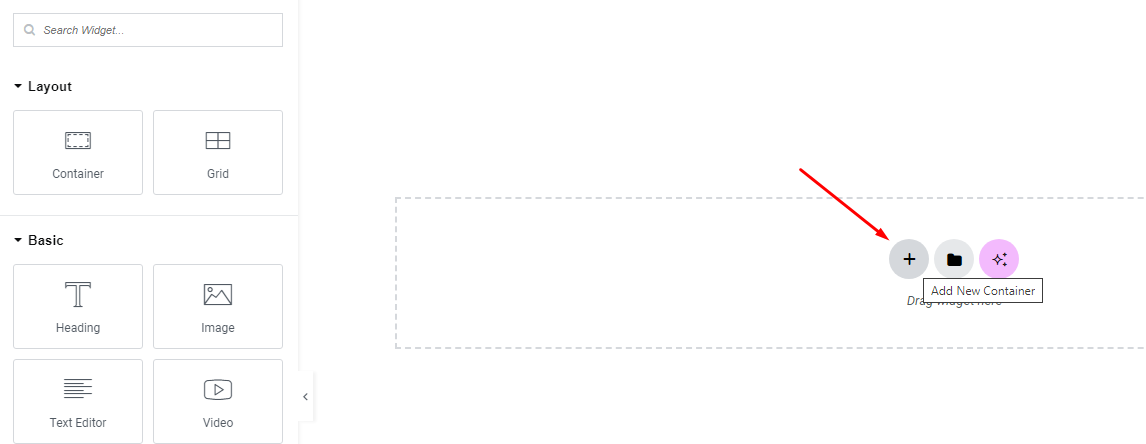
- In 'Elementor edit mode' hit the 'Add new container' button:
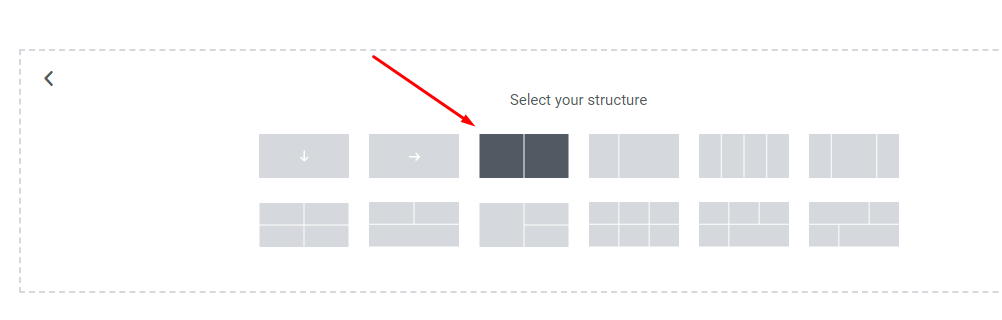
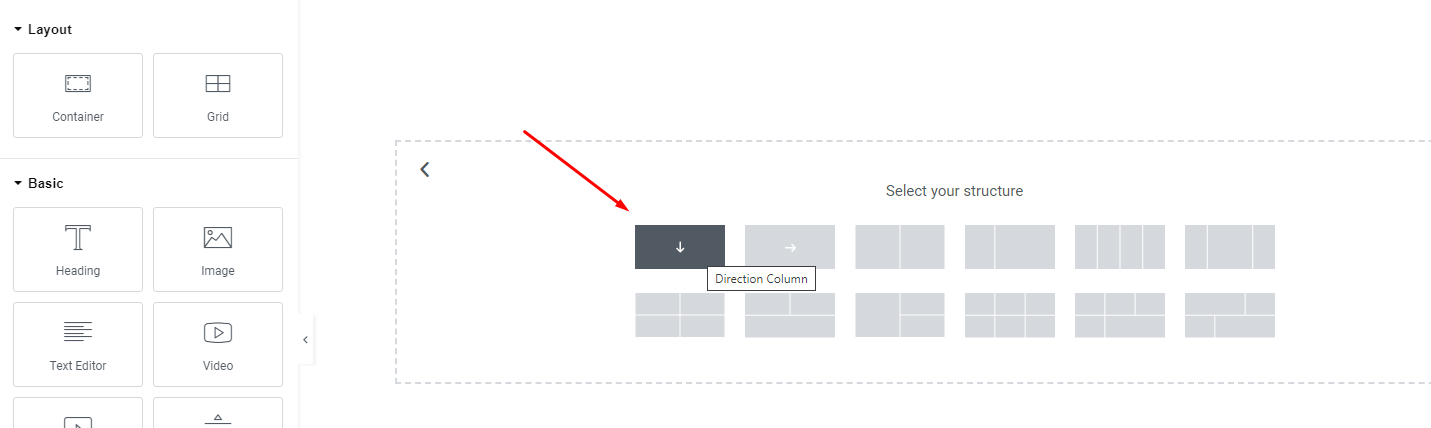
- Select the structure (e.g. one or two columns):
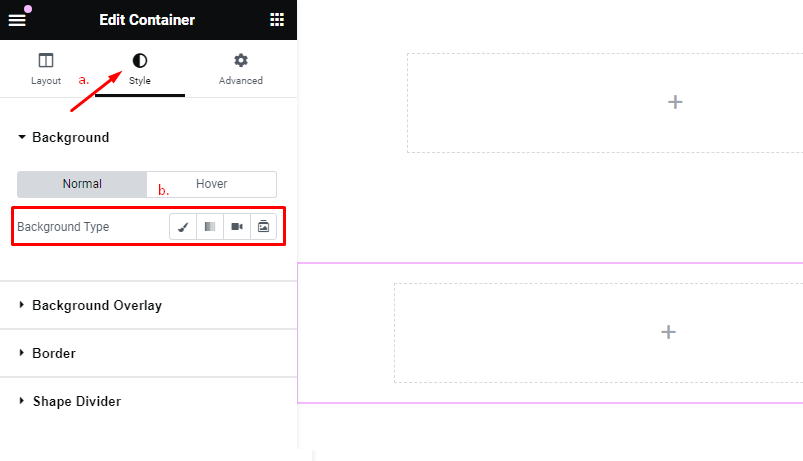
- Edit the container, switch to the Style tab (a.) and add background image, gradient, video or slideshow (b.):
- Then just click on + sign and drag e.g. Heading, Text Editor and Button widgets into it.
- In the Advanced tab set the padding of the container. Set padding for tablet and mobile too (see Important below).
With the Transparent Header template, use a dark or image background for the first section so the light logo and menu stay readable. Upload the light logo in PromptPress - admin panel > General Settings.
Adding Columns
- Add a new container and select e.g. the 'two columns' structure:
- Select the first container (column) and in the 'Layout' tab set the width in %:
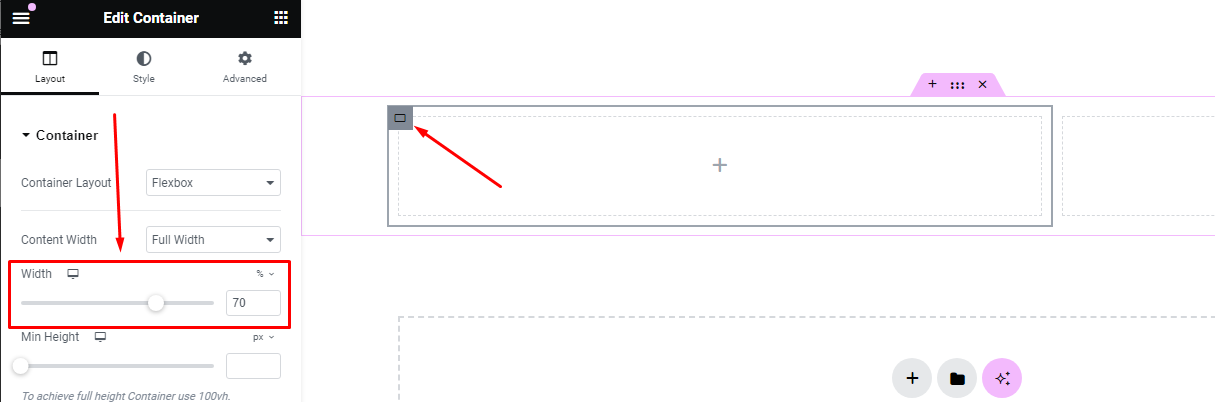
- Do the same with the second column; the sum of widths should be 100%. E.g. if the first column is 70% of width the second should be 30%.
- Click on the + sign and drag widgets into the columns, e.g. 'TMNF Posts' or 'TMNF Blog' into the wide column and the 'Sidebar' widget into the narrow one.
Crafted Addons adds these Elementor widgets: TMNF Slider, TMNF Posts, TMNF Posts (List), TMNF Posts (Slider), TMNF Blog, TMNF Category and TMNF Authors.
Important
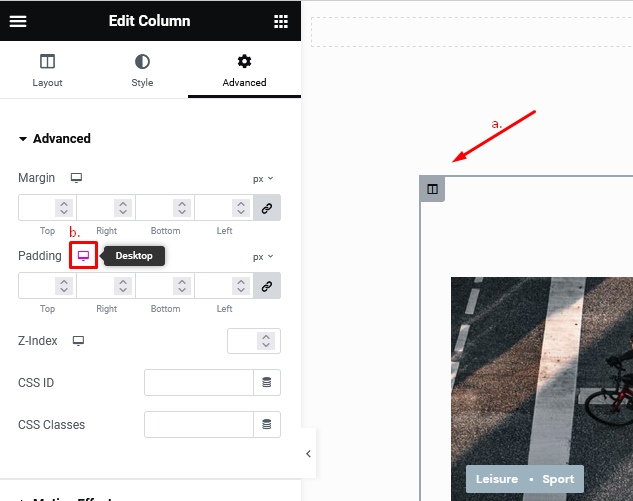
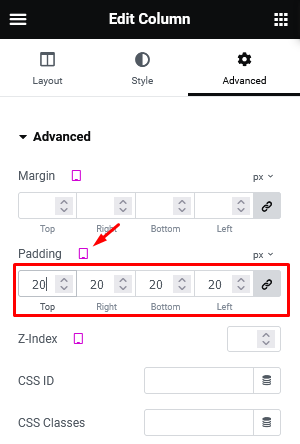
- Adjust padding for desktop and responsive mode! When you are building any layout using 'columns' in Elementor; click on small 'Desktop' icon in the Advanced tab; 'Tablet' and 'Mobile' icons will appear. Then click on 'Tablet' and 'Mobile' icon and check your layout on small screens. If necessary, adjust padding/margin values for the responsive mode.
Adding Prompts to the Homepage
There are two ways to show prompts on an Elementor page:
- Prompt widgets: in the Elementor panel search for “Prompt” – the AI Prompt Manager widgets are in the “WordPress” section: Prompt search & filters, Prompts (cards or list), Prompt categories and Single prompt.
- Shortcode: drag the Shortcode widget and enter e.g.
[apm_prompts per_page="6" filters="1"]
Both are described in the AI Prompt Manager documentation (shortcode options).
Blog Template
- If you want to create News (or Blog) page, create empty page (Default template),
- name it News (or Blog),
- go to Settings > Reading and set this page as 'Posts page' (see screenshot above),
- adjust number of posts.
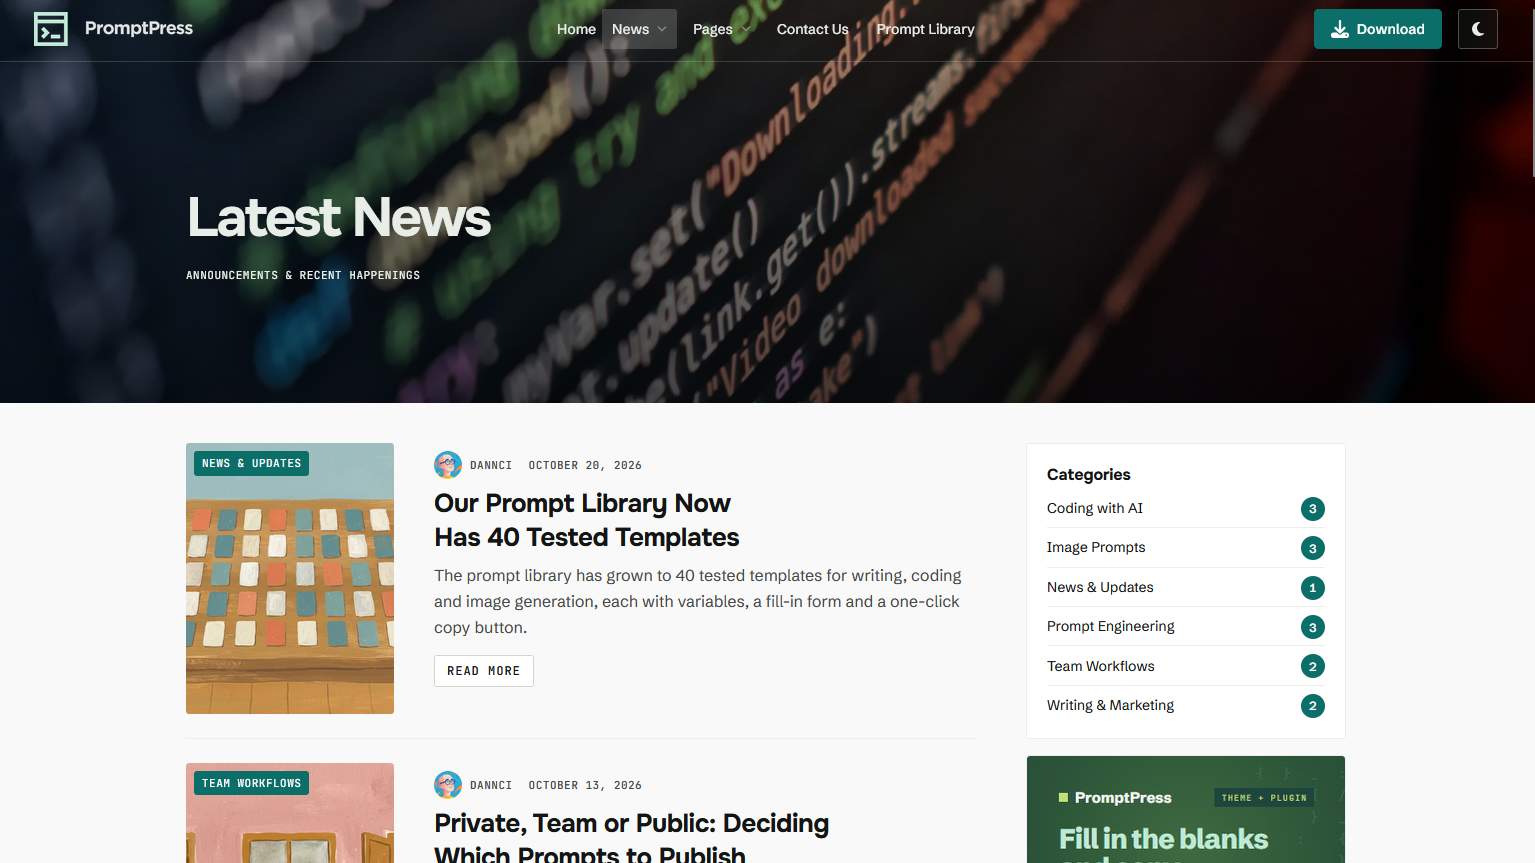
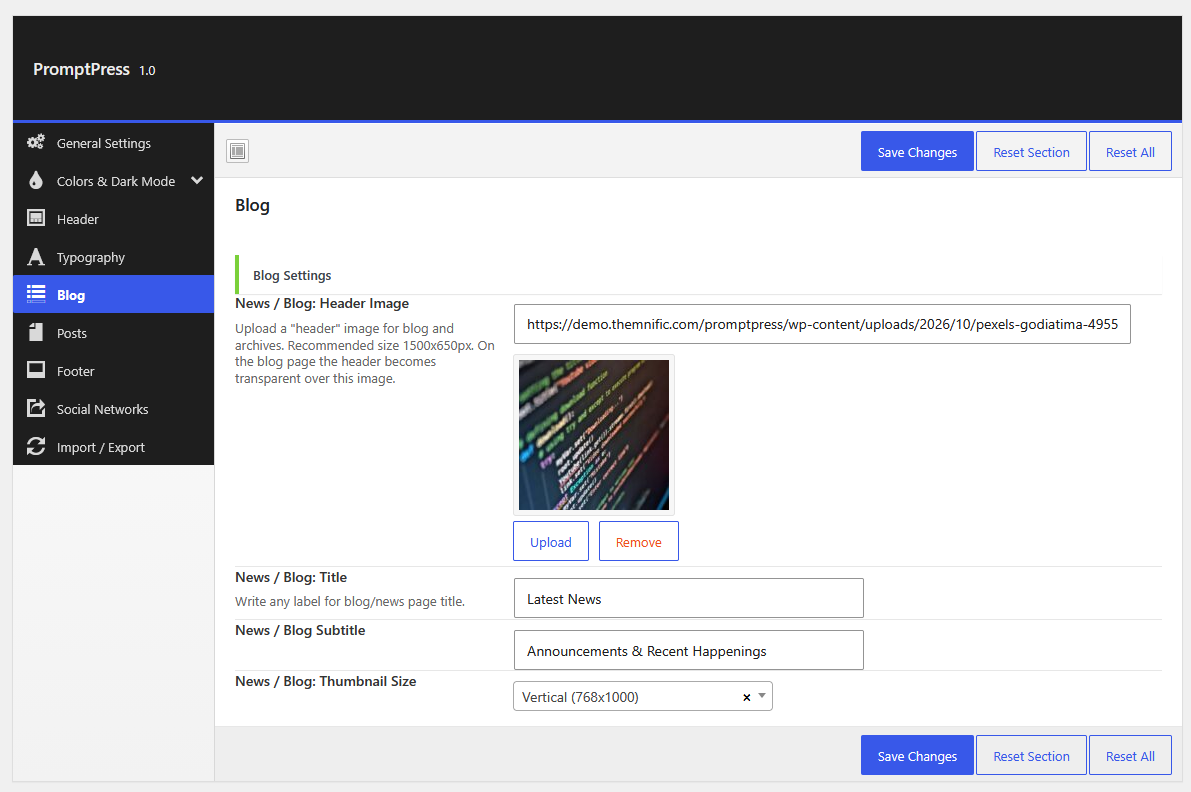
The title, subtitle, header image and thumbnail size of the blog are set in PromptPress - admin panel > Blog.
Theme Setup - Admin panel
Theme comes with an options panel (PromptPress - admin panel) with functions divided to these sections:
General Settings:
- Upload your Main Logo,
- upload the Light Logo: used on the transparent header and in dark mode.
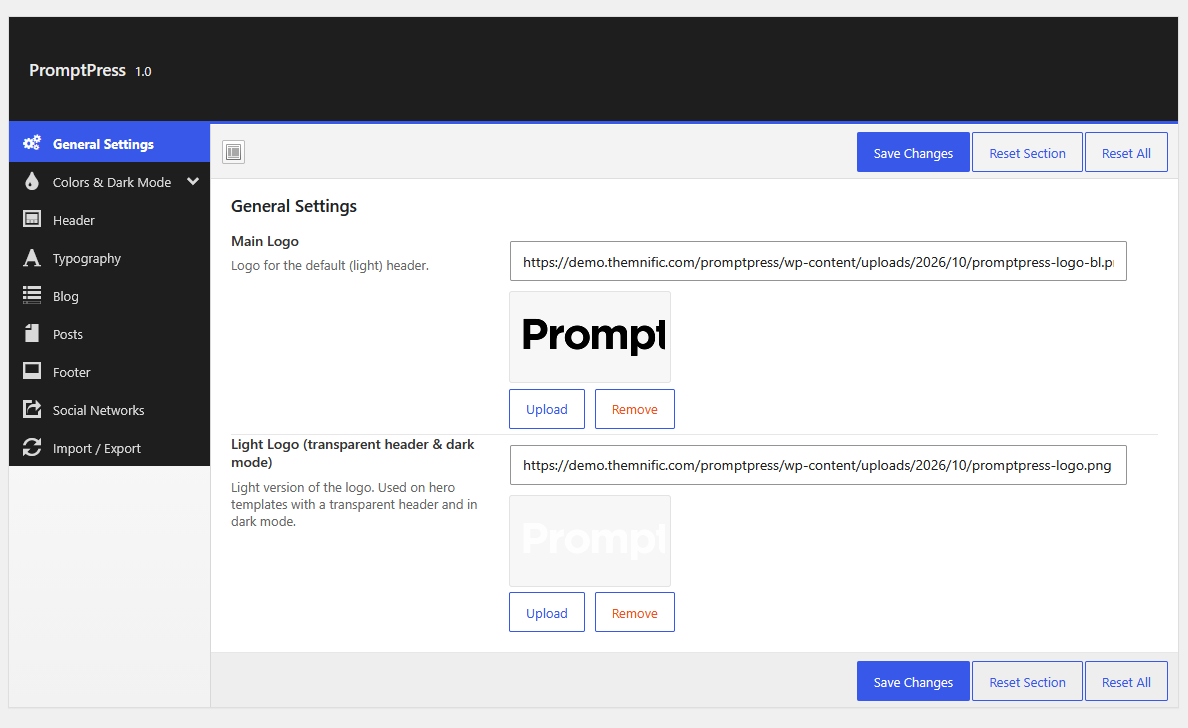
Without a logo, the site title is shown as text.
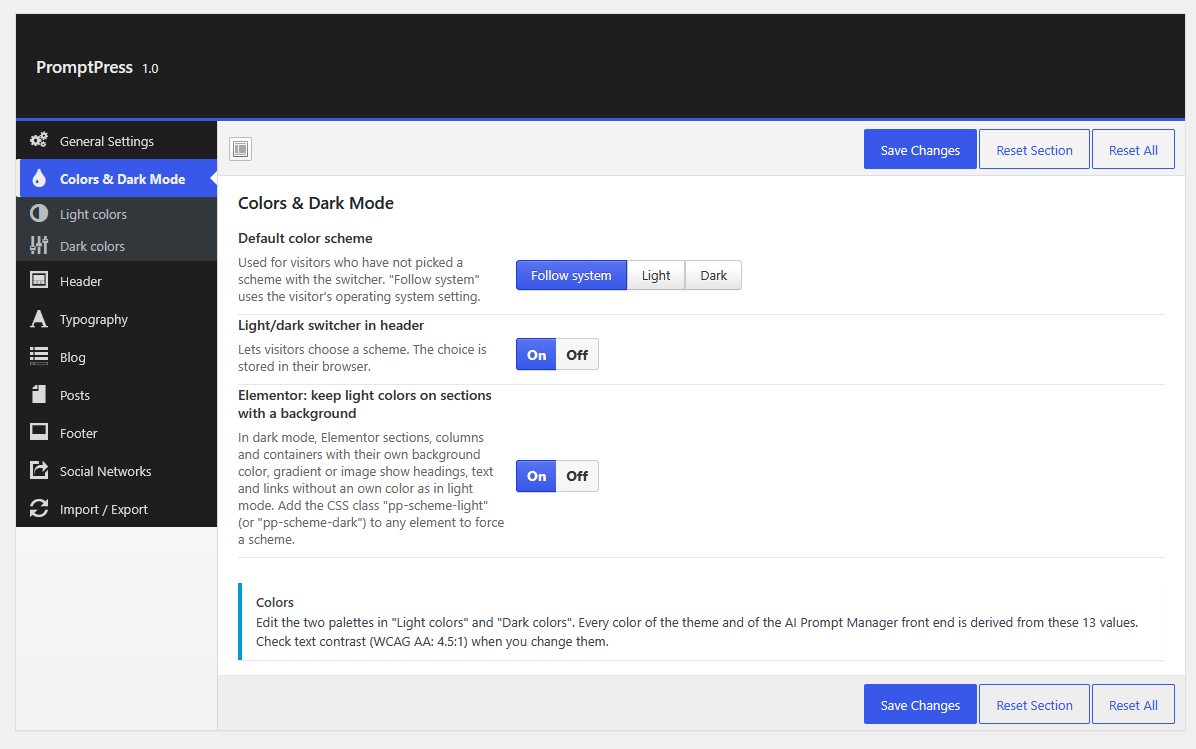
Colors & Dark Mode:
- Default color scheme: Follow system, Light or Dark,
- Light/dark switcher in header: on/off,
- Elementor: keep light colors on sections with a background (see Dark Mode).
Light colors / Dark colors:
Each scheme has 13 colors (page background, surface, borders, field borders, body text, headings & navigation, muted text, links, links hover, accent, text on accent, inverse background/text/accent), plus optional Header colors and Button colors. Leave the optional ones empty to use the page / accent colors. Every color of the theme and of the prompt library is derived from these values.
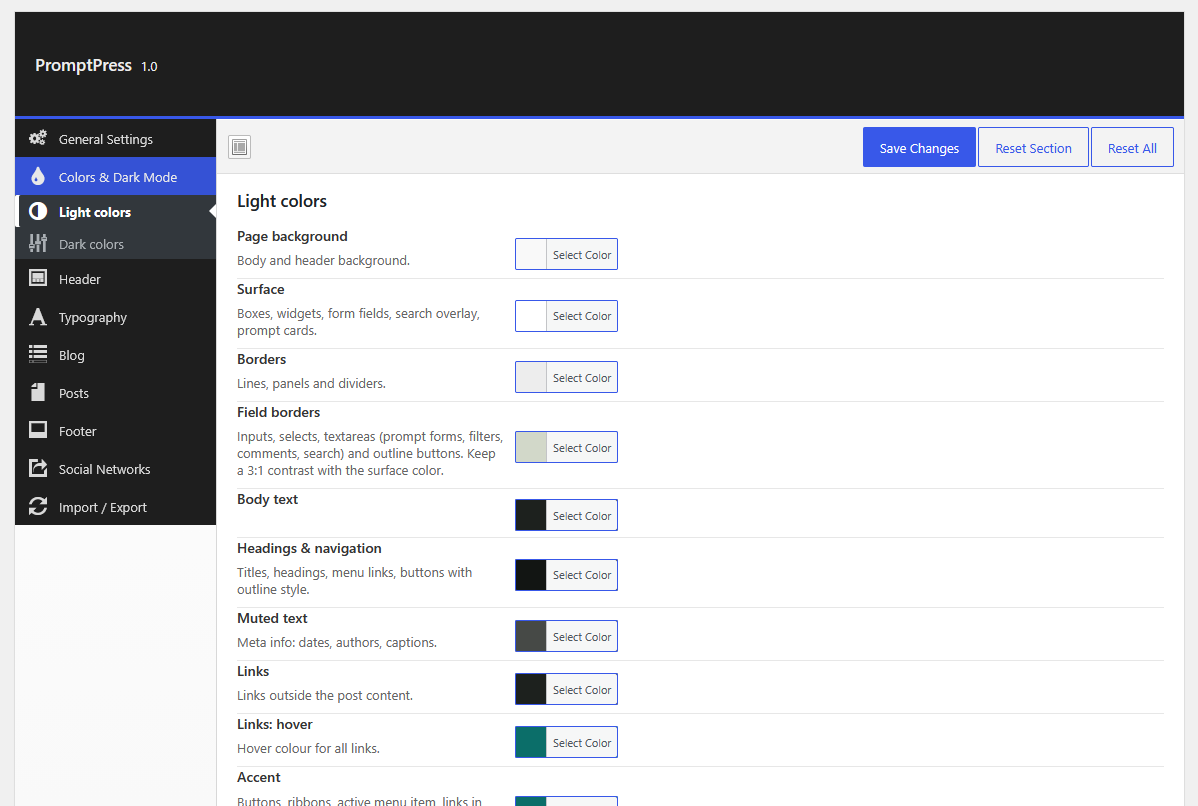
Check the text contrast when you change colors (WCAG AA: 4.5:1 for normal text). Use the Reset Section button to go back to the default palette.
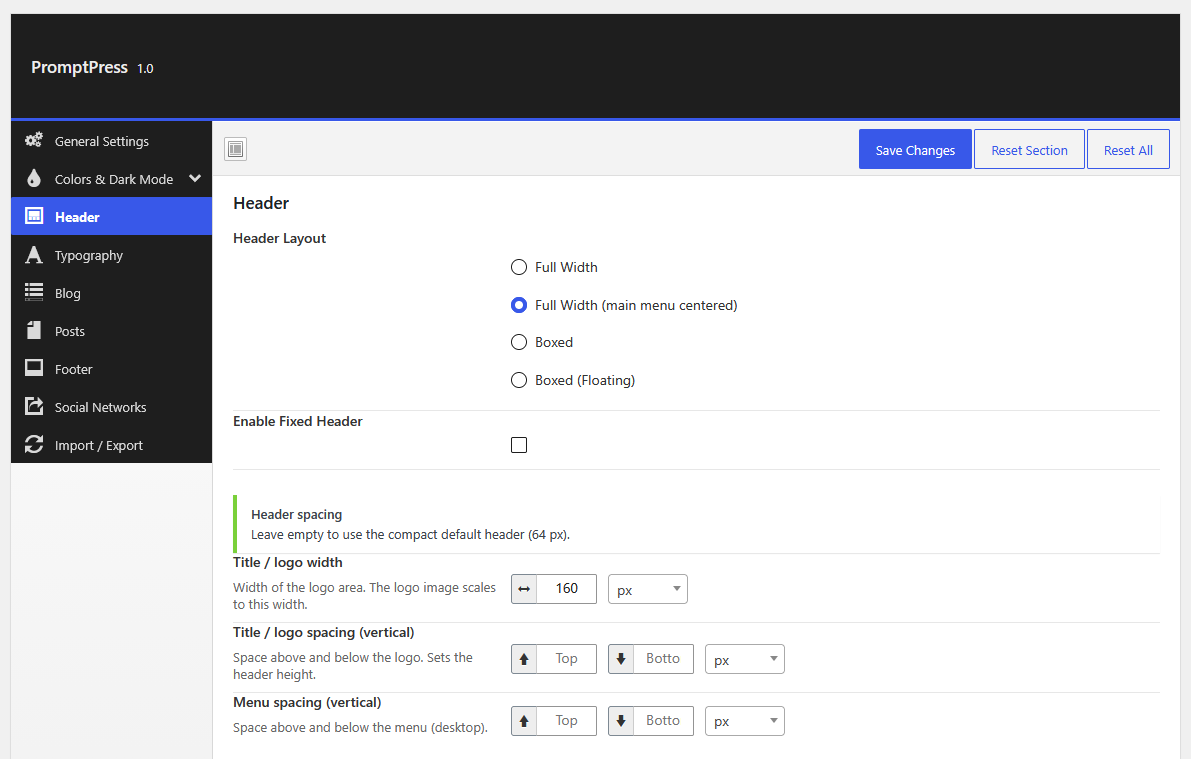
Header:
- Select the header layout: Full Width, Full Width (main menu centered), Boxed or Boxed (Floating) (default),
- enable fixed header,
- set the title/logo width and vertical spacing and the menu vertical spacing (empty = compact header).
Typography:
Select the Google Font, weight, size, letter spacing and text transform for: Body text, Headings, Site title, Navigation, Dropdown menus, Page titles, Post titles in lists, Small titles, Buttons, Meta and Headings inside posts.
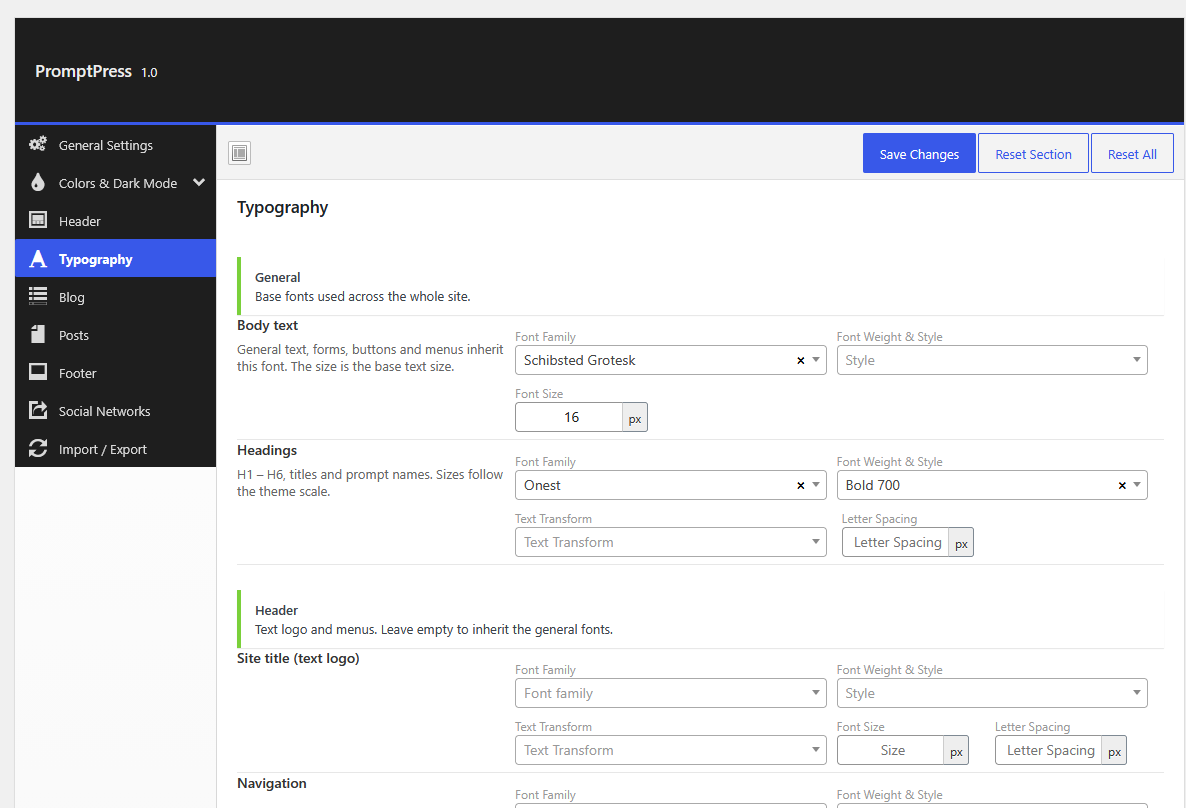
The theme loads all selected fonts in one optimized request. Prompt text and code always use the bundled JetBrains Mono font.
Blog:
- Upload the Header Image for the blog page (it also turns on the transparent header there),
- add the title and subtitle of the blog page,
- select the thumbnail size: Square, Vertical or Horizontal.
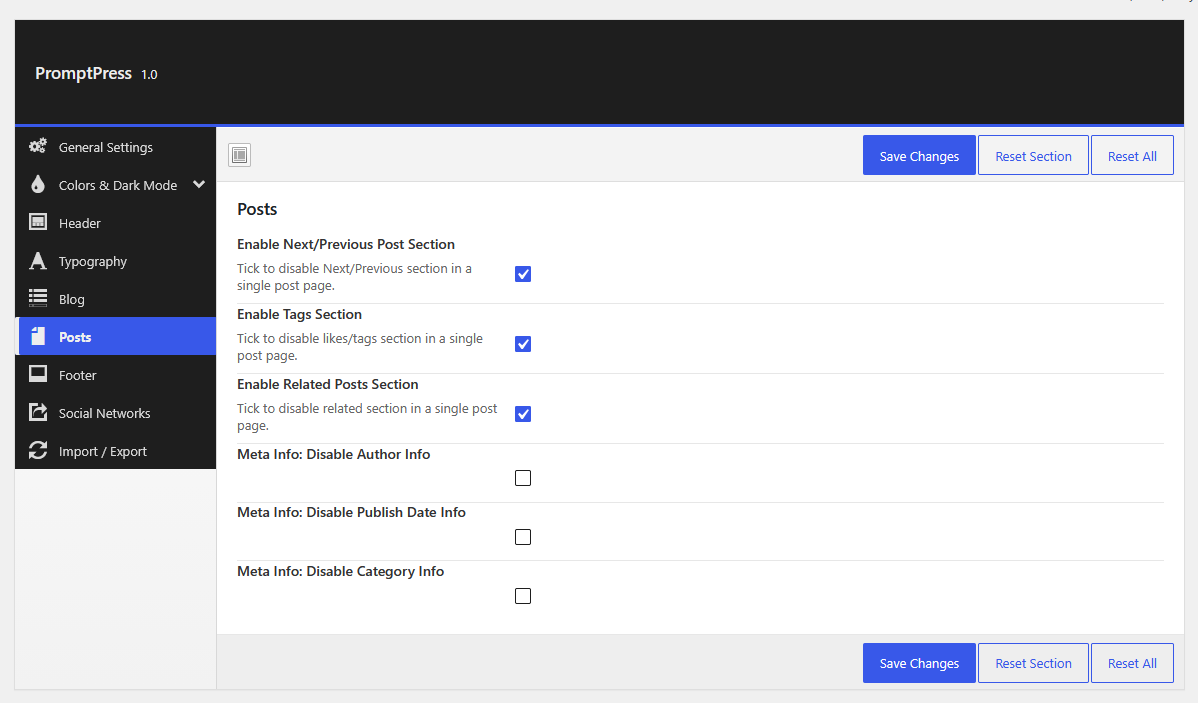
Posts:
- Turn On/Off the Next/Previous, Tags and Related Posts sections,
- hide the author, date or category info.
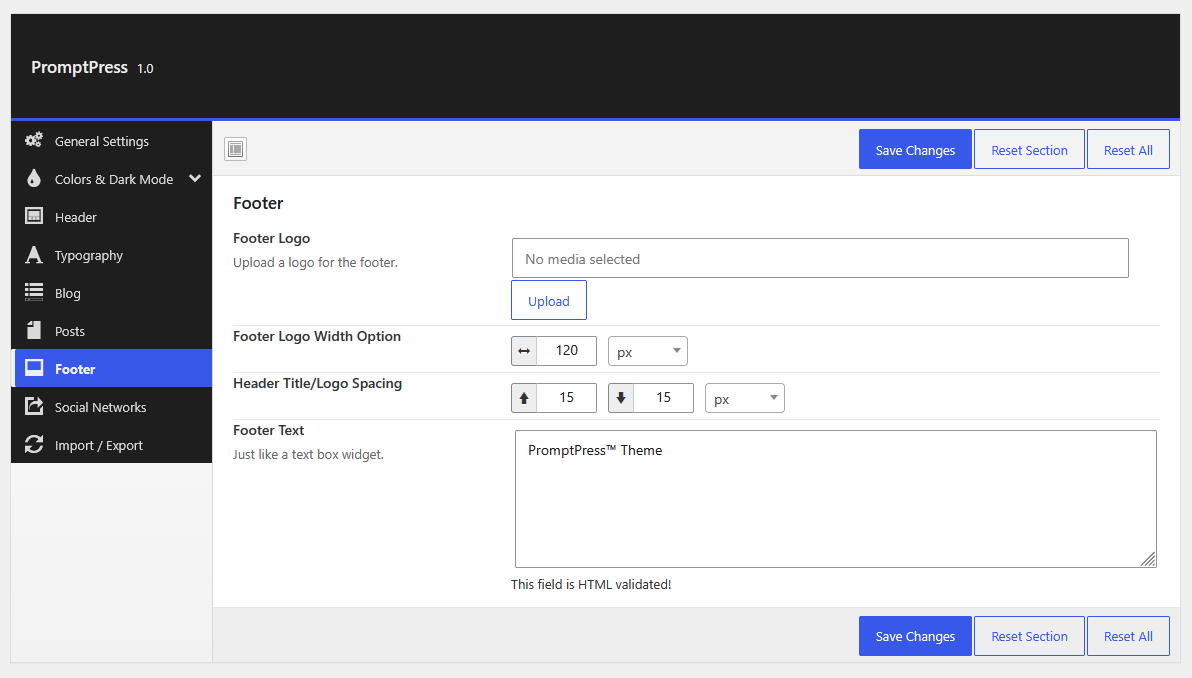
Footer:
- Upload the footer logo and set its width and spacing,
- add the footer text.
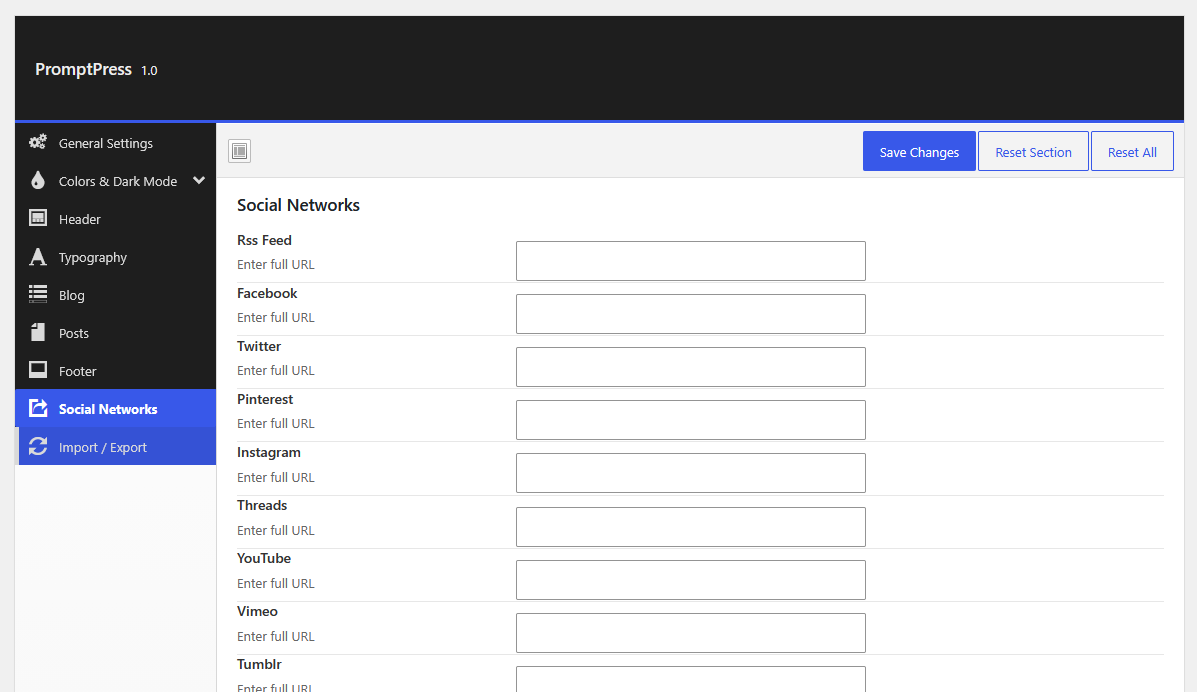
Social Networks Settings:
- Enter the full URL of your profile (https:// included). Icons are shown in the footer for every filled field.
If you are finished click on "Save Changes" button!
Dark Mode
PromptPress has a light and a dark color scheme. Visitors switch between them with the button in the header; their choice is remembered in their browser. Visitors who didn't choose get the Default color scheme (Follow system = the visitor's operating system setting).
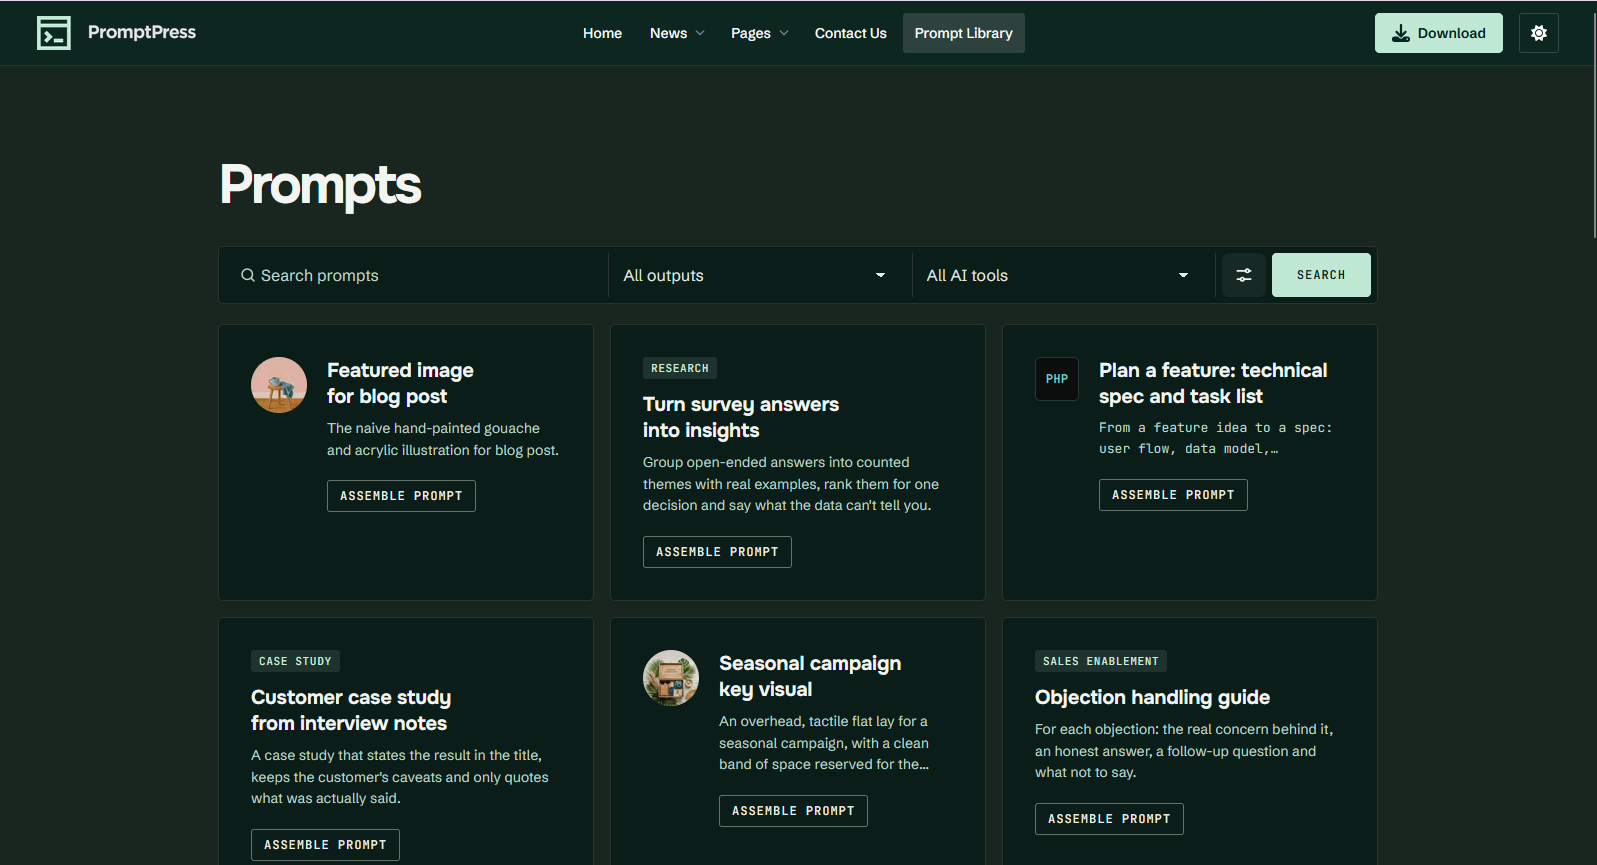
- Set the colors of both schemes in Light colors and Dark colors,
- upload the Light Logo (General Settings): it is used in dark mode,
- to offer only one scheme, set the default scheme and turn the switcher off.
Elementor sections in dark mode
With “Elementor: keep light colors on sections with a background” on (default), Elementor sections with their own background color, gradient or image keep light-mode text colors, so a light section stays readable in dark mode. To force a scheme on any element, add the CSS class pp-scheme-light or pp-scheme-dark (Advanced tab > CSS Classes).
Prompt Library (Custom Posts)
The prompt library is provided by the AI Prompt Manager plugin. It adds the ‘Prompts’ custom post type:
- prompts with
{{variables}}that visitors fill in and copy, - three outputs (Text, Image, Code) with their own fields,
- reusable Instructions (persona, context, rules),
- Projects, Use Cases and AI Tools to organise and filter prompts,
- Private / Team / Public visibility.
Create prompts in the main dashboard menu in the Prompts section. The library is at yoursite.com/prompts/ – add it to your menu as a Custom Link.
Everything about creating and displaying prompts (variables, instructions, visibility, block, shortcode, widgets, settings) is in the AI Prompt Manager documentation »
What PromptPress adds to the prompt library:
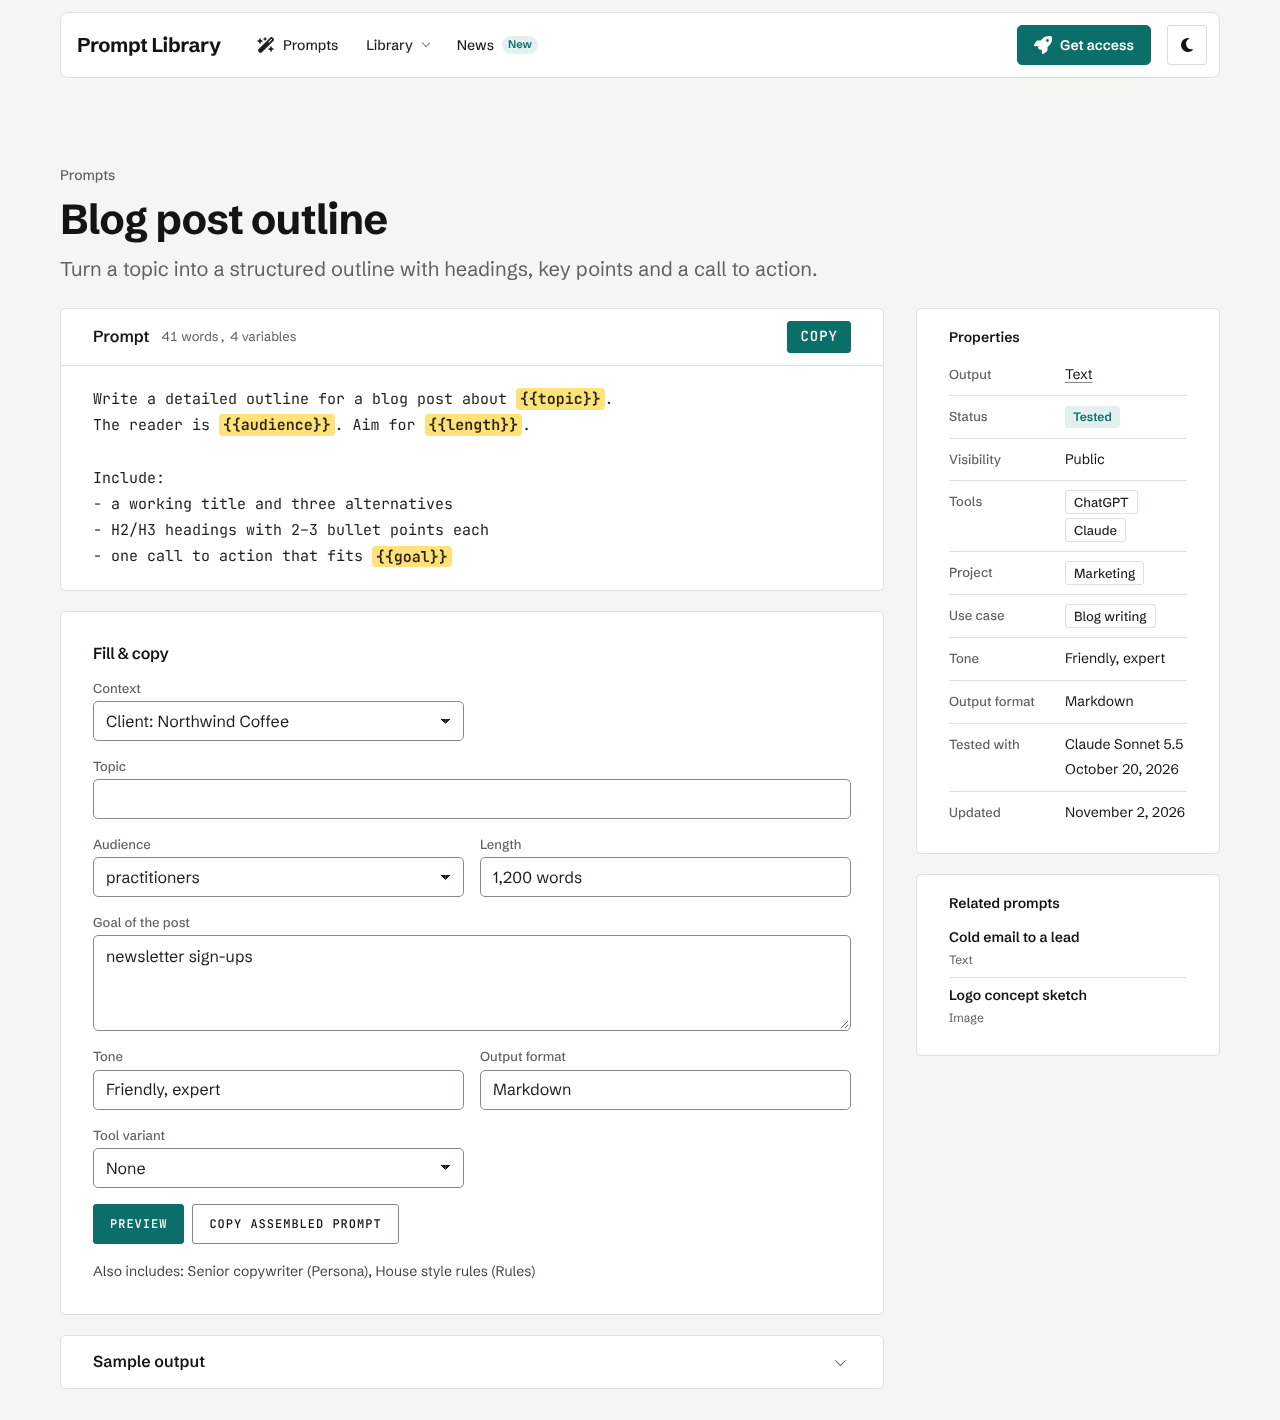
- A two-column prompt page (“record view”): the prompt panel with word and variable count, Copy and Edit buttons, the Fill & copy form and the sample output on the left; a Properties sidebar (Output, Status, Visibility, Tools, Project, Use case, output fields, Tested with, Updated) and up to five Related prompts on the right:
- Styled cards, search & filter bar, widgets, command palette and code highlighting in both color schemes,
- highlighted
{{variables}}and dark code panels, - image prompts show their result images in a grid that opens in a lightbox (Lightbox for Gallery & Image Block plugin).
Related prompts share the project or use case first, then the output. They only include prompts the visitor is allowed to see.
Note! The prompt library and prompt pages are archives generated automatically. They cannot be edited in any editor (Gutenberg, Elementor). To build a custom prompts landing page, use a normal page with the prompt widgets or the shortcode (see Adding Prompts).
Custom Templates
- Create a page (or post).
- In the right side section open Template and select a custom template:
- Click the Publish button to publish your page/post.
| Template | Layout |
|---|---|
| Default template | Content with the right sidebar. |
| Default template (with Hero Section) | Featured image as a hero header, content with sidebar. |
| Left Sidebar Layout | Content with the sidebar on the left. |
| Left Sidebar Layout (with Hero Section) | Hero header, sidebar on the left. |
| No Sidebar Layout (Wide) | Full width, no sidebar. Good for Elementor pages. |
| No Sidebar Layout (Boxed) | No sidebar, boxed width. |
| No Sidebar Layout (Narrow) | No sidebar, narrow reading column. |
| No Sidebar Layout (Narrow - Hero Section) | Hero header, narrow column. |
| Elementor Full Width (Transparent Header) | Pages only. Full width with the header over the first section of your content. Made for Elementor homepages. |
Transparent header: the header is transparent on Elementor Full Width (Transparent Header) always, and on No Sidebar Layout (Wide), (Boxed), (Narrow - Hero Section) and Left Sidebar Layout (with Hero Section) when the page has a featured image.
Custom Widgets
Go to Appearance > Widgets and setup your widget areas: Sidebar, Footer 1 – Footer 5 (and Shop Sidebar with WooCommerce). We are using the 'Classic Widgets' plugin to achieve this look: https://wordpress.org/plugins/classic-widgets/.
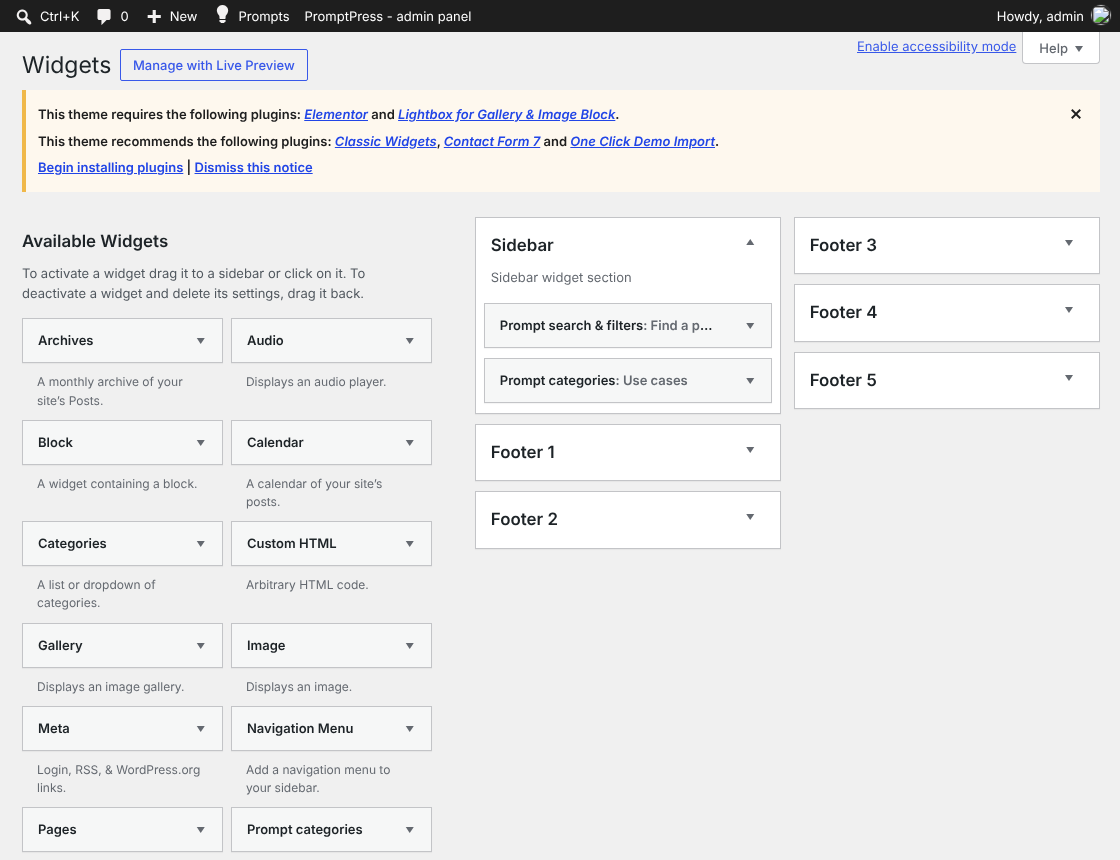
Footer columns
On desktop the footer has five columns; Footer 1 is twice as wide. Empty areas keep their place, so leaving Footer 2 and 3 empty moves the next ones to the right (as in the screenshot). On tablets Footer 1 is full width and the others are in two columns; on phones everything is in one column.
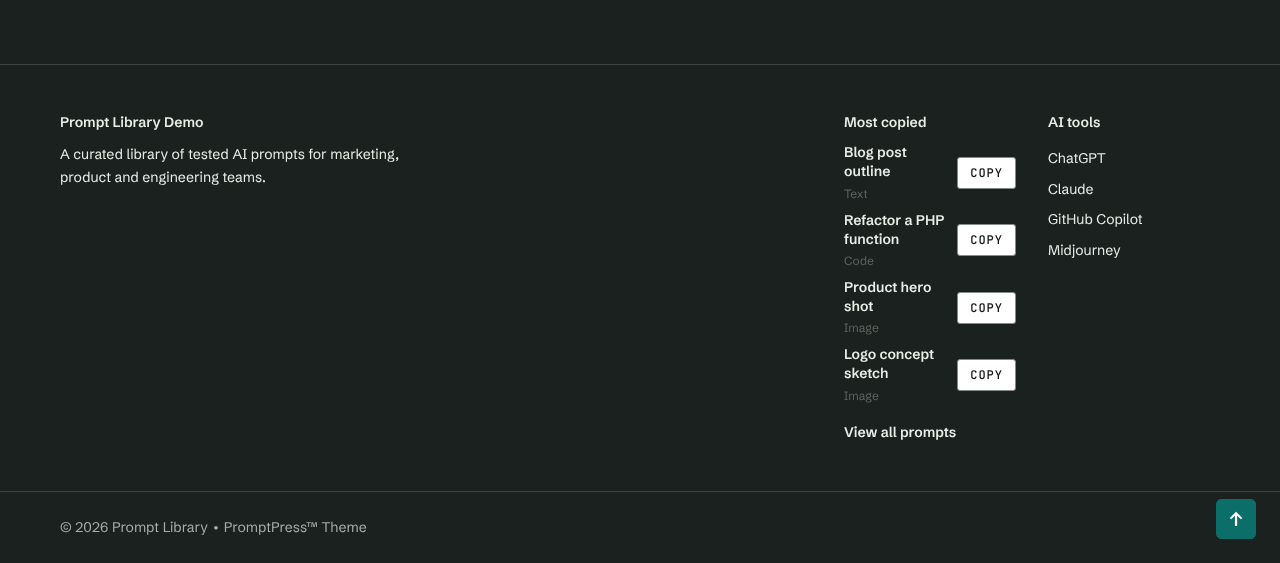
Available widgets
- AI Prompt Manager: Prompt search & filters, Prompts, Prompt categories, Single prompt – styled by the theme. See the plugin documentation.
- Crafted Addons: TMNF Featured Posts Widget.
- All WordPress core widgets.
Images
IMPORTANT! It is possible that after theme activation are images wrongly cropped and look ugly!
In this case use this plugin: https://wordpress.org/plugins/regenerate-thumbnails/ to regenerate old thumbnails from previous theme.
After plugin installation start regeneration in Tools > Regenerate Thumbnails. This process can take a while and you cannot close tab/window until regeneration is done.
Images and thumbnails are generated automatically.
To display thumbnails correctly upload images via WP interface using "Set featured image" button.
Featured Images - Minimal Sizes
- Hero header (hero templates, transparent header): 1800×650px,
- Single post/page (classic image): 807×500px,
- Blog thumbnails: 768×1000px (Vertical), 768×768px (Square) or 768×480px (Horizontal), depending on the Blog option.
Result images of image prompts are added in the prompt itself (see Result Images).
Custom Menu
! Create own custom menus first! Please see following tutorial !
The theme has three menu locations: Primary Menu (main menu), Additional Menu (right side of the header) and Footer Menu:
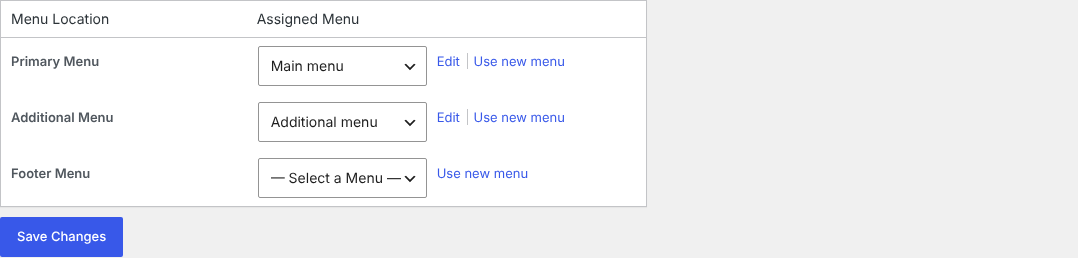
Highlighted Menu Item (button)
1. Toggle 'Screen Options' on the top of the menu screen and enable 'CSS Classes' and 'Description':

2. Toggle any menu item and type special into the 'CSS Classes' field. This makes the item look like a button (e.g. “Get access” in the Additional menu):
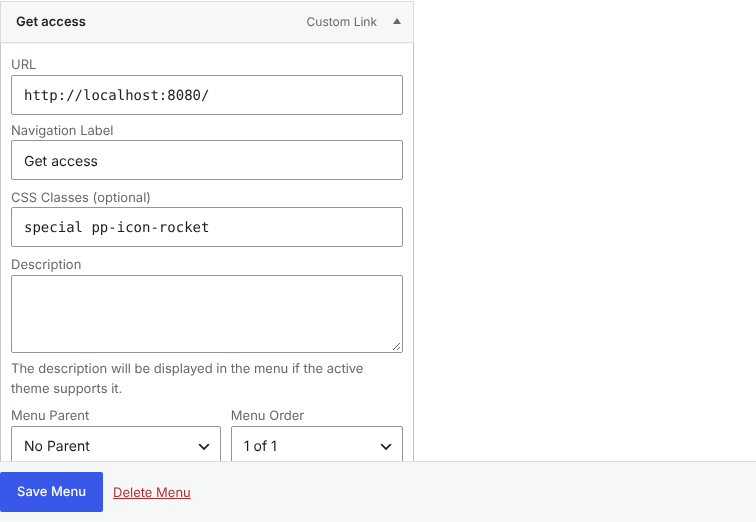
Note: the newitem class shows a small ‘New’ label next to the menu item, the important class adds a small accent dot.
Menu Item Description
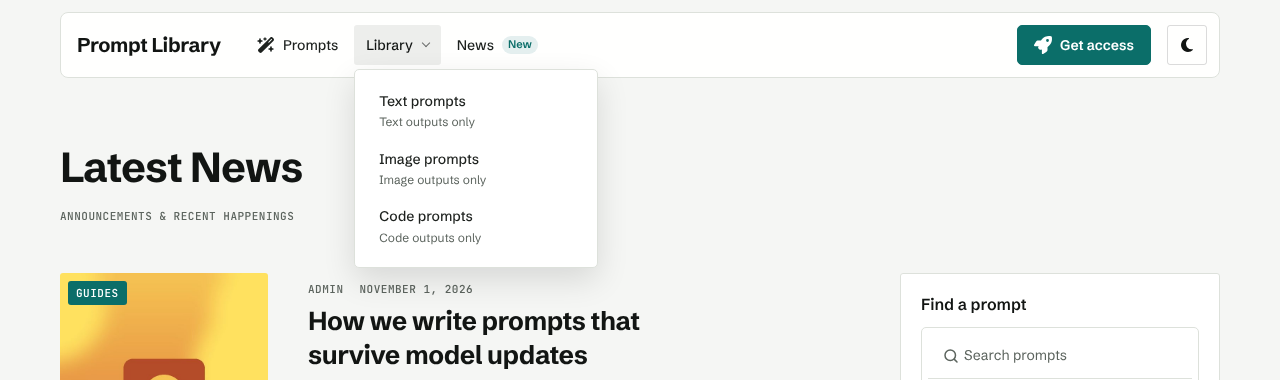
Type a short text into the 'Description' field of a menu item. In the Main and Additional menu it is shown under the item title, e.g. in dropdowns:
Menu Icons
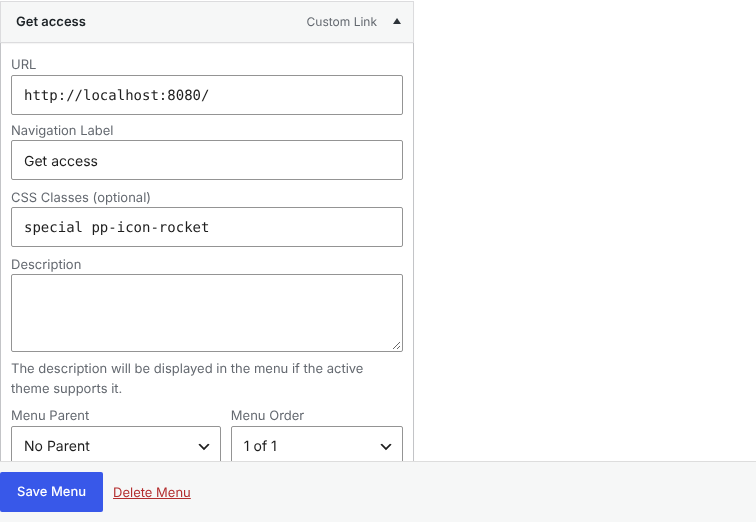
1. Add the class pp-icon-{name} to a menu item in the Main or Additional menu, e.g. pp-icon-download. It can be combined with other classes: special pp-icon-rocket is a button with an icon.
2. Add pp-icon-only to show only the icon on the desktop menu bar (the label stays in the mobile menu and for screen readers).
3. All available icons can be found here ›
https://themnific.com/docs/promptpress/icons.html4. One icon per item. Available names:
house, download, book, book-open, folder, folder-open, tag, tags,
wand-magic-sparkles, image, images, code, terminal, star, heart, user,
users, user-plus, envelope, paper-plane, cart-shopping, bag-shopping,
credit-card, circle-info, circle-question, gear, bolt, rocket, lightbulb,
layer-group, list, table-cells, comments, comment, newspaper, file-lines,
pen, arrow-right, arrow-up-right-from-square, lock, crown, gift, play,
calendar-days, phone, location-dot, chart-line, globe, robot, fire,
graduation-cap, briefcase, palette, brain, sliders
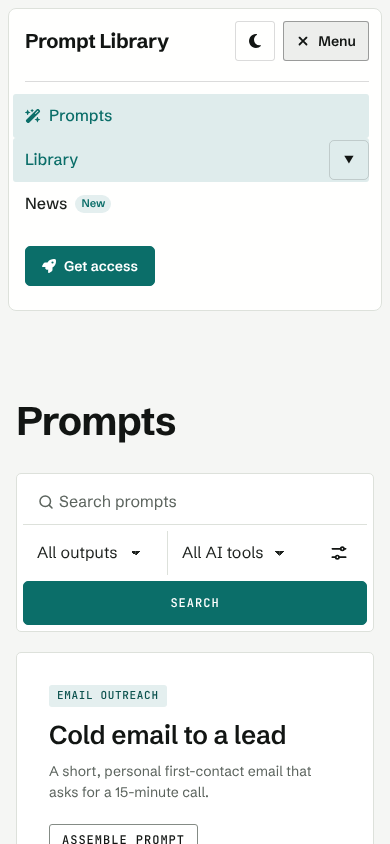
Unknown names show no icon. On phones the menu opens as a panel under the header bar:
Plugins
AI Prompt Manager
Adds the prompt library. Full documentation: AI Prompt Manager documentation.
Elementor
Elementor plugin will help you create awesome layouts for your pages. Go to Appearance » Install Plugins and install and activate it. The theme disables Elementor's default colors and fonts automatically, so the theme styles apply – no setup needed.
Crafted Addons
Bundled with the theme (Appearance » Install Plugins). Adds the TMNF Elementor widgets, the TMNF Featured Posts Widget, the ‘Themnific Post Options’ box (show or hide the featured image on a post) and social profile fields on the user profile screen (used in the author box).
Lightbox for Gallery & Image Block
Plugin page: Plugin Homepage. Opens result images of image prompts in a lightbox. No setup needed.
Contact Form 7
Plugin page: Plugin Homepage. Create your form(s) in the main wp menu > Contact and place them on any page using the shortcode. Form fields and buttons use the theme styles. Please read plugin documentation for more info.
MailChimp for WordPress
Plugin page: Plugin Homepage. Optional; it is offered by the demo importer. Use it to create a newsletter sign-up form.
WooCommerce
The theme supports WooCommerce (product gallery zoom, lightbox and slider). With WooCommerce active, a Shop Sidebar widget area appears in Appearance > Widgets.
SEO plugins
The theme prints Schema.org structured data. It switches it off automatically when Yoast SEO, Rank Math, SEOPress or All in One SEO is active, so there is no duplicate data.
Translation
This theme is translation/localization ready and comes with promptpress.pot file. File is located in ../promptpress/languages/ folder.
- You need to use localized WordPress installation (Settings > General > Site Language) in the first place. If not, localization will be not successful.
- .pot file is located in root theme folder inside 'languages' sub-folder:
../promptpress/languages/ - Download Poedit software here, (or use the free Loco Translate plugin),
- Install software and translate
promptpress.potfile (line by line), - Once you have translated all the strings, you can save this as your .po file.
The filename of your .po / .mo file is crucial! Gettext uses the ISO 639 standard for language abbreviations and ISO 3166 for locales. If your translation is written in Deutsch for example, your file name will look like de_DE.po. Capitalization is also important here. For a full list of language and country codes, check out these two links:
Once you save, Poedit by default automatically creates a .mo file alongside your .po file. Put these files into
wp-content/languages/themes/namedpromptpress-de_DE.po/promptpress-de_DE.mo(so theme updates don't overwrite them).
Your internationalization is complete after uploading .po and .mo files on your server.
Note: the ‘New’ menu badge (newitem class) comes from the stylesheet and is not in the .pot file. Change its text in Appearance > Customize > Additional CSS:
.newitem > a::after, .new_item > a::after { content: 'Neu'; }
The AI Prompt Manager plugin is translated separately (see plugin documentation).
Developers
Always make changes in a child theme, so theme updates don't overwrite them.
- Prompt page: the theme overrides the plugin template
prompt-manager/content-single.php. Copy it to your child theme (your-child-theme/prompt-manager/content-single.php) to change it. Filters:promptpress_apm_properties(rows of the Properties sidebar),promptpress_apm_related(related prompts). - Colors: all colors are
--pp-*CSS custom properties. Filters:promptpress_color_tokens,promptpress_color_switcher_enabled. JavaScript:window.promptpressColorScheme.set( 'light' | 'dark' | 'auto' ), eventpromptpress:color-scheme. - Fonts:
promptpress_typography_fields,promptpress_google_fonts_url(return''to disable Google Fonts, e.g. when a plugin hosts them locally). - Schema.org:
promptpress_schema_enabled,promptpress_schema_publisher,promptpress_schema_article_types,promptpress_schema_graph. - Icons:
promptpress_icon( $name ), add icons with thepromptpress_iconsfilter. - Other:
promptpress_hero_templates,promptpress_transparent_header,promptpress_light_scope_selectors,promptpress_wrapper_classes,promptpress_content_width.
Theme options are stored by Redux in the themnific_redux option. The full changelog is in readme.txt in the theme folder.
Once again, thank you so much for purchasing this theme.